The Ultimate Cheesecake-Filled Pumpkin Cake Pops: Step-by-Step Fall Recipe & 25 Variations


Meta Description: Master the art of Fall baking with our moist, cheesecake-filled Pumpkin Cake Pops! Includes a detailed step-by-step master recipe and 25 delicious flavor variations.
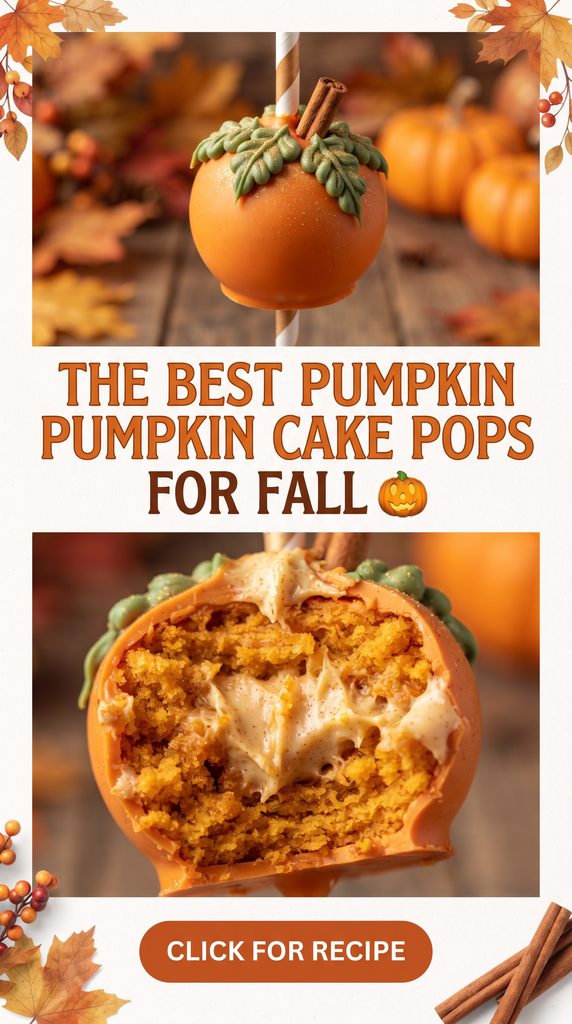
If there is one dessert that perfectly captures the cozy, spiced essence of autumn, it’s the Pumpkin Cake Pop. But we aren’t just making any cake pops today. We are elevating the classic by injecting them with a rich, tangy cheesecake frosting center.
Whether you are hosting a Halloween party, looking for the perfect Thanksgiving dessert, or need an impressive edible gift, this step-by-step guide will help you create the ultimate Fall treat. Plus, stick around for 25 unique step-by-step variations to customize your batch!
Why You’ll Love This Pumpkin Cake Pops Recipe
- Incredibly Moist: The secret is in the cheesecake frosting binder, which keeps the cake crumbs perfectly tender.
- Perfect Flavor Balance: The warm spices of the pumpkin cake are cut beautifully by the tangy cream cheese center.
- Make-Ahead Friendly: They freeze beautifully, making party prep a breeze.
- Endlessly Customizable: From spooky Halloween ghosts to elegant Thanksgiving gold-dusted treats.
Ingredients for the Master Recipe
For the Pumpkin Cake Base:
- 1 box (15.25 oz) spice cake mix (or pumpkin cake mix)
- 1 cup canned pure pumpkin puree (not pumpkin pie filling)
- 1/3 cup vegetable oil
- 3 large eggs
- 1 tsp ground cinnamon
- ½ tsp ground nutmeg
For the Cheesecake Frosting (The Binder & Filling):
- 8 oz (1 block) full-fat cream cheese, softened to room temperature
- ¼ cup (½ stick) unsalted butter, softened
- 2 cups powdered sugar, sifted
- 1 tsp pure vanilla extract
- 1 tbsp heavy cream (optional, for consistency)
For the Coating & Decorating:
- 24 oz orange, white, and dark chocolate candy melts (or melting wafers)
- 1 tbsp coconut oil or paramount crystals (to thin the coating)
- 40-50 lollipop sticks (6-inch)
- Fall-themed sprinkles, edible gold dust, or candy eyes
The Master Recipe: Step-by-Step Instructions
Step 1: Bake the Pumpkin Cake
Preheat your oven to 350°F (175°C). Grease a 9×13 inch baking pan. In a large bowl, mix the spice cake mix, pumpkin puree, vegetable oil, eggs, cinnamon, and nutmeg until fully combined. Pour the batter into the prepared pan and bake for 25-30 minutes, or until a toothpick inserted in the center comes out clean. Let the cake cool completely. (Pro tip: Chilling the cake in the fridge for an hour makes it easier to crumble).
Step 2: Make the Cheesecake Frosting
While the cake cools, beat the softened cream cheese and butter together in a stand mixer until smooth and creamy. Gradually add the powdered sugar and vanilla extract. Mix until fluffy. If it’s too stiff to spread, add the heavy cream one teaspoon at a time.
Step 3: Crumble and Combine
Break the completely cooled pumpkin cake into large chunks and place them in a large mixing bowl. Using your hands or a fork, crumble the cake into fine, even crumbs. Add half of the cheesecake frosting to the crumbs. Mix gently with your hands or a spatula until the mixture holds together when pinched. Do not add all the frosting at once, or the cake pops will be too heavy and fall off the stick!
Step 4: Roll and Chill
Scoop the mixture using a medium cookie scoop (about 1 tablespoon each) and roll it into smooth, tight balls. Place them on a baking sheet lined with parchment paper. Crucial Step: Place the baking sheet in the freezer for exactly 15-20 minutes. They need to be very firm before dipping.
Step 5: Prep the Sticks
Melt a small handful of your chosen candy melts in a microwave-safe bowl (30-second intervals, stirring in between). Dip the tip of a lollipop stick into the melted candy, then insert it halfway into a chilled cake pop ball. The melted candy acts as “glue” to hold the pop on the stick. Return to the freezer for 10 minutes.
Step 6: Melt the Coating
In a deep, narrow microwave-safe cup (a glass measuring cup works perfectly), melt your candy melts and coconut oil together until completely smooth. The coconut oil thins the coating, ensuring a smooth, thin shell that won’t crack.
Step 7: Dip and Decorate
Take a cake pop out of the freezer. Dip it straight down into the candy melts, covering the stick joint. Tap the stick gently against the side of the cup to let excess coating drip off. Do not twist the pop in the coating. While the coating is still wet, add your sprinkles or decorations immediately.
Step 8: Set and Serve
Stick the decorated cake pop into a styrofoam block or a cake pop stand to dry. Let them set at room temperature for 15-20 minutes until the shell is completely hard.
25 Step-by-Step Variations & Flavor Recipes
Once you have mastered the base recipe, use these 25 step-by-step variations to create a massive, diverse dessert table!
🎃 Classic & Spiced Variations
1. Classic Orange & White Chocolate
Step 1: Dip the chilled pop in melted white candy melts.
Step 2: Tint the remaining white melts with orange gel food coloring.
Step 3: Drizzle the orange coating over the white base and let set.
2. Dark Chocolate & Sea Salt
Step 1: Melt dark chocolate candy melts with a pinch of espresso powder.
Step 2: Dip the cake pop completely in the dark chocolate.
Step 3: Immediately sprinkle with flaky sea salt before it hardens.
3. Cinnamon Sugar Churro Pops
Step 1: Dip the pop in melted white chocolate.
Step 2: In a small bowl, mix ¼ cup sugar with 1 tsp cinnamon.
Step 3: Roll the wet coating generously in the cinnamon sugar mixture.
4. Maple Pecan Crunch
Step 1: Add ½ tsp maple extract to the cheesecake frosting binder.
Step 2: Dip the pop in white candy melts.
Step 3: Roll the bottom half in finely crushed, toasted pecans.
5. Gingerbread Spiced Coating
Step 1: Mix ½ tsp ground ginger and ¼ tsp cloves into melted white candy melts.
Step 2: Dip the cake pop into the spiced white coating.
Step 3: Top with a small crystallized ginger piece.
🕸️ Spooky Halloween Variations
6. Classic Ghost Cake Pops
Step 1: Dip the pop in pure white candy melts.
Step 2: Use a black edible marker to draw two large oval eyes and an ‘O’ shaped mouth.
Step 3: Let dry completely before handling.
7. Mummy Cake Pops
Step 1: Dip the pop in white candy melts.
Step 2: Melt a small amount of white melts in a piping bag.
Step 3: Pipe thin, zig-zag lines across the pop to look like bandages, leaving a gap for candy eyes.
8. Black Widow Spider Pops
Step 1: Dip the pop in black candy melts.
Step 2: Pipe a red candy melt “hourglass” shape on the front.
Step 3: Stick 8 black licorice laces into the sides for legs.
9. Mini Pumpkin Patch Pops
Step 1: Dip the pop in orange candy melts.
Step 2: Use a black edible marker to draw vertical pumpkin lines.
Step 3: Pipe a small green candy melt “stem” at the top.
10. Candy Corn Cake Pops
Step 1: Dip the pop in white candy melts.
Step 2: Once set, dip the bottom third in yellow melts.
Step 3: Once set, dip the very bottom tip in orange melts.
🦃 Elegant Thanksgiving Variations
11. Autumn Leaf Stamped Pops
Step 1: Dip the pop in orange or yellow candy melts.
Step 2: Take a clean, small paintbrush and gently press it into the wet coating to create leaf vein textures.
Step 3: Dust lightly with edible bronze luster dust.
12. Gold-Dusted Elegance
Step 1: Dip the pop in white or yellow candy melts.
Step 2: Once fully set, use a dry, clean food-safe brush to paint edible gold luster dust over the shell.
Step 3: Serve on a tiered dessert stand.
13. Caramel Apple Drizzle
Step 1: Dip the pop in white candy melts.
Step 2: Drizzle heavily with thick caramel sauce.
Step 3: Press crushed graham crackers around the base to resemble pie crust.
14. Cranberry Orange Pops
Step 1: Add 1 tsp orange zest to the cheesecake frosting.
Step 2: Dip the pop in white candy melts.
Step 3: Press dried, sugared cranberries into the wet coating.
15. Turkey Cake Pops
Step 1: Dip the pop in brown candy melts.
Step 2: Pipe red and yellow candy melt “feathers” on the back using a piping bag.
Step 3: Stick a small piece of yellow candy corn on the front for the beak and add candy eyes.
🍫 Decadent & Indulgent Variations
16. Oreo Crumble Coating
Step 1: Dip the pop in white candy melts.
Step 2: Crush 4-5 Oreo cookies into fine dust.
Step 3: Roll the wet cake pop entirely in the Oreo crumbs.
17. Biscoff Cookie Butter Drizzle
Step 1: Dip the pop in white candy melts.
Step 2: Warm 2 tablespoons of Biscoff cookie butter in the microwave for 10 seconds.
Step 3: Drizzle the warm cookie butter over the set white coating.
18. Toasted Coconut & White Chocolate
Step 1: Dip the pop in white candy melts.
Step 2: Toast ½ cup of shredded coconut in a dry skillet until golden.
Step 3: Roll the wet coating in the toasted coconut.
19. Peanut Butter Cup Swirl
Step 1: Melt orange candy melts and white candy melts in separate bowls.
Step 2: Swirl them together gently in the dipping cup.
Step 3: Dip the pop, then top with a mini Reese’s peanut butter cup.
20. Espresso Mocha Pumpkin
Step 1: Dissolve 1 tsp instant espresso powder into the cheesecake frosting.
Step 2: Dip the pop in dark chocolate candy melts.
Step 3: Top with 3 coffee beans (chocolate covered).
🌟 Unique & Fun Variations
21. Red Velvet Pumpkin Swirl
Step 1: Use red velvet cake crumbs mixed with the pumpkin cake.
Step 2: Melt red and white candy melts separately.
Step 3: Dip in white, then drizzle with red to create a marbled effect.
22. Lemon Zest & White Chocolate
Step 1: Add 1 tbsp fresh lemon juice to the cheesecake frosting.
Step 2: Dip the pop in white candy melts.
Step 3: Grate fresh lemon zest directly over the wet coating.
23. Pistachio & Cranberry
Step 1: Dip the pop in white candy melts.
Step 2: Finely chop unsalted pistachios and dried cranberries.
Step 3: Press the pop into the nut and fruit mixture.
24. Graham Cracker & Marshmallow
Step 1: Dip the pop in white candy melts.
Step 2: Crush graham crackers into coarse crumbs.
Step 3: Roll in crumbs, then stick mini marshmallows on top.
25. Nutella Hazelnut Drizzle
Step 1: Dip the pop in milk chocolate candy melts.
Step 2: Warm 2 tablespoons of Nutella until easily drizzle-able.
Step 3: Drizzle over the set chocolate and top with a crushed hazelnut.
Pro-Tips for Perfect Pumpkin Cake Pops Every Time
- Temperature is Everything: Your cake must be completely cool before crumbling. If it’s warm, it will turn into a gummy paste. Your cake balls must be very cold before dipping, or they will expand and crack the chocolate shell.
- Don’t Over-Mix the Frosting: When adding the cheesecake frosting to the cake crumbs, stop as soon as it holds together. Too much moisture will cause the cake pop to slide off the stick.
- The “Tap” Technique: When dipping, tap your wrist (not the stick) to shake off excess coating. Twisting the stick creates a bulge of chocolate at the base, which can cause cracking.
- Thinning the Coating: If your candy melts are too thick, add a tiny bit of coconut oil or paramount crystals. Never use milk or water, as it will seize the chocolate.
Frequently Asked Questions (FAQs)
How do I store Pumpkin Cake Pops?
Store them in an airtight container at room temperature for up to 3 days. Because of the cream cheese frosting, if your kitchen is very warm, store them in the fridge for up to 1 week.
Can I freeze cake pops?
Yes! You can freeze the undipped cake balls for up to 6 weeks. You can also freeze fully dipped cake pops for up to 2 months. Thaw them in the fridge overnight before serving to prevent condensation from ruining the coating.
Why did my cake pop crack?
Cracking happens when there is a temperature shock. If your cake ball was too cold and your candy coating was too hot, the cake inside expands and breaks the shell. Let your cake balls sit at room temperature for 2-3 minutes before dipping.
Can I use real chocolate instead of candy melts?
You can, but real chocolate is much thicker and harder to work with for cake pops. If you use real chocolate, you must temper it properly and thin it with a little bit of coconut oil to get a smooth, thin shell.
Ready to Bake?
There is nothing quite like the combination of spiced pumpkin cake and creamy cheesecake frosting wrapped in a crisp chocolate shell. Whether you choose the classic orange drizzle or the elegant gold-dusted version, these Pumpkin Cake Pops are guaranteed to be the star of your Fall dessert table.
Did you try this recipe? Leave a comment below and let us know which of the 25 variations was your favorite! Don’t forget to pin this post to your Fall Desserts board for later!
SEO Note for the Publisher: Ensure you add an internal link to your “Halloween Treats” category, an external link to a high-authority site (like the FDA for food safety regarding cream cheese), and upload high-quality, vertical images (2:3 ratio) for each of the 25 variations to maximize Pinterest traffic.